
Picture this: it’s a busy Monday morning and your technician is elbow-deep in a carburetor rebuild — wire brush in one hand, can of degreaser in the other — scrubbing away at a part that still doesn’t look clean. Sound familiar?
Manual cleaning is one of the most labor-intensive, time-consuming, and frankly thankless jobs in any auto repair shop. And yet, it directly affects repair quality, part longevity, and customer satisfaction. That’s why more and more workshops are switching to an ultrasonic cleaner for engine parts — and most of them say they wish they’d made the change sooner.
In this guide, Hisashi Industries walks you through everything: how ultrasonic cleaning works, what to buy, how to use it correctly, and why it’s one of the smartest investments your shop can make this year.
An Ultrasonic Cleaner for Engine Parts uses high-frequency sound waves (28–40 kHz) to create millions of microscopic bubbles in a cleaning solution. These bubbles implode on contact with dirty surfaces — a process called cavitation — removing grease, carbon, rust, and varnish from fuel injectors, carburetors, valves, pistons, and more. Most auto repair shops need a 20–40 liter tank with a built-in heater, running 10–30 minute cycles with an automotive degreasing solution.
An ultrasonic cleaner is essentially a tank of liquid that vibrates at frequencies too high for the human ear to detect — typically between 25,000 and 40,000 cycles per second. These vibrations generate an enormous number of tiny vacuum bubbles in the fluid. When those bubbles collapse near a dirty surface, the energy released physically blasts away contaminants — not by abrasion, but by implosion.
The result? Engine parts come out genuinely clean — not surface-wiped, but clean in every crevice, thread, internal gallery, and micro-passage. That matters enormously for engine components where a partially cleaned fuel passage or a residue-coated valve seat can undermine an otherwise excellent rebuild.
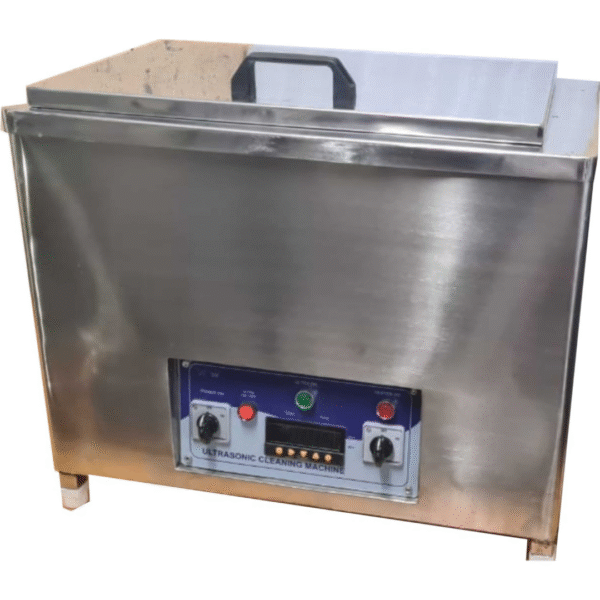
Component | What It Does | Why It Matters |
Stainless Steel Tank | Holds cleaning solution and parts | Resists corrosion from degreasers and solvents |
Ultrasonic Transducers | Convert electrical energy into sound waves | Drive the cavitation process — more transducers = more even coverage |
Generator / Power Unit | Powers and controls transducer frequency | Controls cleaning intensity and adjustability |
Heater | Warms the solution to 50–65°C | Heat dramatically accelerates grease and oil removal |
Timer | Automates cycle duration | Consistent results; prevents over-cleaning delicate parts |
Basket / Rack | Suspends parts above tank floor | Prevents transducer damage; ensures even cleaning on all sides |
The short answer: almost everything. The slightly longer answer is that ultrasonic cleaning is ideally suited for metal components with complex shapes, internal passages, or fine surface detail — in other words, exactly the kinds of parts that manual cleaning struggles with most.
Part / Component | Primary Contaminant Removed | Typical Cycle Time |
Fuel Injectors | Carbon deposits, varnish, fuel residue | 10–20 minutes |
Carburetors | Gum, varnish, fuel buildup in jets/passages | 15–25 minutes |
Engine Valves | Carbon buildup, combustion deposits | 20–30 minutes |
Pistons | Oil sludge, carbon, ring groove deposits | 20–30 minutes |
Cylinder Heads | Coolant scale, carbon, oil deposits | 30–45 minutes |
Brake Calipers | Brake dust, corrosion, old fluid | 15–25 minutes |
EGR Valves | Soot, carbon, exhaust residue | 15–20 minutes |
Bearings & Gears | Old grease, metal particles, dirt | 10–15 minutes |
Note: Avoid placing rubber seals, certain plastics, and soft gasket materials directly into the ultrasonic tank — cavitation can degrade them. Always remove seals before cleaning and replace them after.
Beyond the clean parts themselves, the real business case for ultrasonic cleaning comes down to time, consistency, and cost. Here’s how it stacks up against the manual methods most shops still rely on:
Factor | Manual Cleaning | Ultrasonic Cleaning |
Labor Time per Part | 20–60 minutes of active scrubbing | Load, press start, walk away |
Internal Passage Cleaning | Very difficult / often incomplete | Full penetration, no disassembly needed |
Consistency | Varies by technician skill and effort | Same result every cycle |
Risk of Part Damage | Higher — wire brushes, abrasive tools | Low — non-contact, non-abrasive |
Chemical Usage | High — repeated soaking and spraying | Low — diluted solution reused over batches |
Technician Fatigue | High — physically demanding | Minimal — automated process |
Suitable for Delicate Parts | Risky | Yes (with correct frequency setting) |
Return on Investment | Nil — ongoing labor cost | Positive — pays back in saved hours |
The productivity difference alone is significant. A technician who previously spent 40 minutes scrubbing a carburetor by hand can now load it into the machine, handle other work while it runs, and come back to a fully cleaned part. Over a week, that adds up to several recovered hours of billable labor.
Not every ultrasonic cleaner is built for automotive use. The market includes everything from jewelry cleaners to surgical equipment sterilizers. Here’s what to actually evaluate when buying for an auto repair shop:
Specification | What to Look For | Why It Matters |
Tank Size | 20–40L for most shops; 80L+ for high volume | Determines what parts and batch sizes you can handle |
Frequency | 25–28 kHz for heavy parts; 40 kHz for precision | Lower frequency = stronger cavitation for tough carbon/grease |
Heater | Built-in, 50–80°C adjustable range | Heat is essential for grease and oil — cold cleaning is far less effective |
Tank Material | SUS304 stainless steel minimum | Resists corrosion from automotive-grade degreasers |
Power (Wattage) | 300W–1500W depending on tank size | Higher wattage = more cavitation intensity per liter |
Duty Cycle Rating | Commercial/industrial rated for continuous use | Consumer units overheat during all-day workshop operation |
Digital Timer | Programmable 1–99 min range | Prevents over-cleaning; ensures consistent cycles |
Drain Valve | Side drain for easy solution changes | Simplifies maintenance; essential for busy shops |
Pro Tip: If your shop regularly handles both precision parts like injectors and heavy components like cylinder heads, consider a unit with adjustable frequency. Dual-frequency models handle both jobs without needing separate machines.
Getting consistent results isn’t just about having the right machine — it’s about using it correctly. Here’s the process Hisashi Industries recommends for everyday workshop use:
Most engine parts clean in 15–30 minutes per cycle. Light deposits may clean in under 10 minutes, while heavily carbon-fouled components like EGR valves or cylinder heads may require 30–45 minutes or a second cycle with fresh solution.
Use an automotive-formulated aqueous degreasing solution mixed with water, not solvent-based products or household cleaners. For aluminum parts, choose a pH-neutral formula. For steel and cast iron, an alkaline degreaser works well. Always follow the dilution ratio on the label.
When used correctly, ultrasonic cleaning is gentle and non-abrasive. Damage can occur if rubber seals, painted surfaces, or gaskets are submerged, if incompatible solutions are used on sensitive metals, or if parts rest directly on the tank floor rather than in a basket.
Most general auto repair shops are well-served by a 20–40 liter unit, which handles carburetors, brake calipers, injector sets, and valve train components comfortably. High-volume shops or those handling cylinder heads and engine blocks should look at 60–100 liter industrial units.
In a busy workshop, drain and replace the solution every 20–30 cycles or once a week — whichever comes first. Visibly dark, foamy, or oily solution that isn’t producing clean parts is a clear sign it needs replacing.
Yes — even for small shops. If you’re regularly cleaning injectors, carburetors, or brake components, the labor hours saved within the first few months typically cover the cost of the machine. The ongoing savings in technician time and improved repair quality make it a strong long-term investment.
An ultrasonic cleaner for engine parts isn’t a luxury piece of equipment — it’s a practical workshop tool that directly improves repair quality, technician productivity, and the bottom line. Whether you’re rebuilding carburetors, cleaning fuel injectors, or doing full engine rebuilds, the difference between parts cleaned by hand and parts cleaned ultrasonically is visible, measurable, and meaningful.
The shops that invest in the right machine, use the right solution, and follow a consistent process are the ones their customers come back to — because the work holds up. If you’re still relying on manual cleaning methods, there’s genuinely no better time to explore the upgrade.
Ready to Upgrade Your Workshop?
Hisashi Industries supplies professional-grade ultrasonic cleaners built for real automotive workshop demands — right tank sizes, industrial duty cycles, and expert support from day one.
Call Now – +91 9871013815
Visit Us – https://hisashiultrasonic.com/